I still remember the first time I attempted to pour a rosetta in latte art – it was a disaster. The milk was too hot, the pour was too slow, and the design looked more like a blob than a beautiful flower. But I was determined to master this elusive technique, and after months of practice, I finally achieved my first perfect rosetta. The feeling was exhilarating, and I realized that how to pour a rosetta in latte art wasn’t just about following a set of steps, but about understanding the nuances of milk and espresso.
As someone who’s spent years perfecting their craft, I’m often asked for advice on how to pour a rosetta in latte art. My response is always the same: it’s not just about the technique, but about feeling the flow of the milk and understanding the science behind the design. In this article, I’ll share my honest, no-hype approach to mastering the rosetta, including tips on temperature control, pour speed, and design placement. Whether you’re a beginner or an experienced barista, you’ll learn the practical skills and techniques needed to create stunning latte art that will impress even the most discerning coffee lovers.
Table of Contents
Guide Overview: What You'll Need

Total Time: 30 minutes to 1 hour
Estimated Cost: little to no cost (assuming you already have a espresso machine and steaming pitcher)
Difficulty Level: Intermediate
Tools Required
- Espresso Machine (with a steam wand)
- Steaming Pitcher (stainless steel or glass)
- Thermometer (for precise temperature control)
- Steam Wand Tip (clean and free of debris)
Supplies & Materials
- Espresso (high-quality, freshly pulled)
- Steamed Milk (at the correct temperature and texture)
- Latte Art Tool or Spoon (for holding back foam and creating design)
Step-by-Step Instructions
- 1. First, let’s talk about the foundation of a great rosetta: steaming the perfect milk. You want to aim for a microfoam that’s silky smooth and holds its shape, which is crucial for creating the delicate patterns of a rosetta. I like to use a combination of whole milk and a touch of non-fat milk to achieve the ideal consistency.
- 2. Next, you’ll need to _purge your steam wand_ to remove any excess water and ensure a clean start. This might seem like a minor detail, but trust me, it makes a world of difference in the quality of your steamed milk. Give the wand a quick blast to clear out any debris, then wipe it down with a clean cloth to prevent any residual water from affecting your milk.
- 3. Now it’s time to get your milk to the right temperature. You’re aiming for a sweet spot between 140°F and 160°F, where the milk is hot but not scalding. I use a thermometer to get an exact reading, but with practice, you’ll develop a sense of when the milk is ready just by feeling the pitcher. Remember, the temperature of your milk will affect the texture and stability of your rosetta, so don’t skip this step.
- 4. With your milk at the perfect temperature, it’s time to _create the foundation of your rosetta_. Hold the pitcher at an angle and gently pour a small amount of milk into the center of the cup, creating a circular motion with your wrist. This initial pour sets the stage for the rest of your design, so take your time and focus on creating a smooth, even flow.
- 5. Next, you’ll start to build the rosetta pattern. Hold the pitcher close to the surface of the coffee and pour in a steady, smooth stream, moving your hand in a gentle, sweeping motion. Think of it like painting with milk – you’re using the flow of the liquid to create a beautiful, intricate design. Keep your movements slow and deliberate, as you’re aiming for a precise, flowing curve.
- 6. As you continue to pour, _pay attention to the flow rate_ of your milk. You want to maintain a consistent flow to achieve a smooth, even pattern. If the flow rate is too fast, your design will be sloppy and uneven; too slow, and it will be stiff and lifeless. Practice makes perfect, so don’t be discouraged if it takes a few attempts to get the hang of it.
- 7. Finally, finish your rosetta with a flourish. As you complete the final curve of your design, give the pitcher a slight flick of the wrist to create a neat, rounded edge. This is the finishing touch that will make your rosetta truly shine, so don’t be afraid to get creative and add your own personal flair to the design. With practice, you’ll be pouring perfect rosettas like a pro.
Pouring Rosetta Mastery
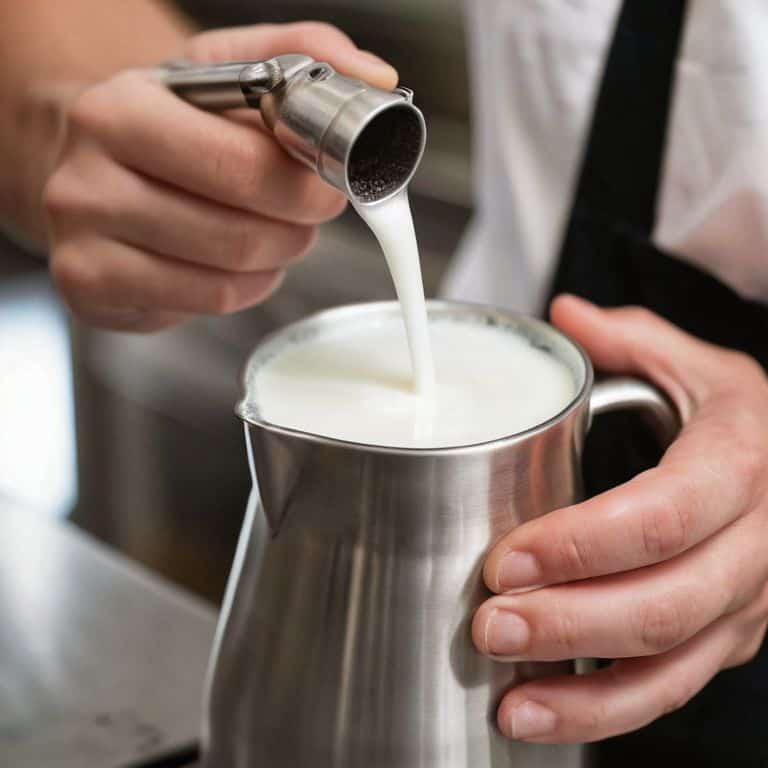
As I delve deeper into the world of latte art, I’ve come to realize that steaming milk for latte art is an art form in itself. The key to creating a beautiful rosetta design lies in the texture and consistency of the steamed milk. I’ve found that using the right latte art tools and equipment can make all the difference in achieving the perfect microfoam. By investing in a good steam wand and a thermometer, you can ensure that your milk is heated to the ideal temperature, resulting in a smooth and silky texture that’s perfect for creating intricate designs.
When it comes to texturing milk for rosetta patterns, it’s all about finding the right balance between air and liquid. I’ve spent countless hours experimenting with different techniques, from stretching and folding to whipping and pouring. The goal is to create a milk that’s both smooth and velvety, with a delicate balance of air and liquid that allows it to hold its shape and create a beautiful, layered design. By mastering this technique, you’ll be able to create advanced latte art designs that will impress even the most discerning coffee connoisseurs.
One of the most common mistakes I see in latte art is the failure to control the flow of milk. This can result in a design that’s uneven, sloppy, or even worse, a complete mess. To avoid this, I always make sure to pour with intention, focusing on the flow and movement of the milk as I create the design. By doing so, I’m able to achieve a level of precision and control that allows me to create intricate, detailed designs that are truly breathtaking.
Rosetta Design Techniques
To truly master the rosetta design, I focus on subtle variations in pouring speed and angle. It’s all about finesse – a delicate dance between the steamed milk and espresso. I’ve found that a steady hand and a deep understanding of milk flow dynamics are key. By experimenting with different pouring heights and techniques, I’ve developed a sense of intuition that guides my pours.
As I pour, I’m deeply focused on the interaction between the milk and espresso, making micro-adjustments on the fly to achieve the perfect harmony of textures and patterns. It’s a meditative process, really – one that requires patience, practice, and a willingness to experiment and learn from mistakes. With time and dedication, you’ll develop your own unique touch and style, and the rosetta design will become a true reflection of your artistry.
Steaming Milk for Art
To truly master the rosetta, you need to understand the art of steaming milk. It’s not just about heating it up, but creating a silky microfoam that’s essential for latte art. I obsess over the temperature and texture, aiming for a precise 140°F to 150°F. This range allows for a smooth, velvety consistency that holds its shape when poured.
When steaming, I focus on stretching and folding the milk to incorporate air, which is crucial for creating the delicate patterns of a rosetta. By adjusting the steam wand’s depth and angle, I can control the amount of air introduced, resulting in a perfectly balanced microfoam. This step requires patience and practice, but trust me, it’s worth the effort – a well-steamed milk can make all the difference in your latte art.
Refining Your Craft: 5 Essential Tips for Pouring a Rosetta in Latte Art
- Precise Temperature Control: Maintaining a steaming temperature between 140°F and 160°F is crucial for creating silky, velvety milk that holds its shape and design
- Understanding Milk Stretching: The art of stretching milk to the perfect consistency, neither too thick nor too thin, is vital for achieving intricate designs like the rosetta
- Free Pouring Techniques: Mastering the flow and speed of pouring is key to creating symmetrical, balanced patterns; it’s all about feel and practice
- Rosetta Pattern Breakdown: To pour a perfect rosetta, it’s essential to understand the pattern’s components, including the central circle, the leaves, and the stems, and how they harmonize
- Practice with Intent: Every pour is an opportunity to refine your technique; focus on one aspect at a time, whether it’s the flow rate, the pouring height, or the steaming quality, to incrementally improve your rosetta design skills
Key Takeaways for Mastering the Rosetta
Pouring a rosetta in latte art is not just about following steps, but about developing a feel and finesse that comes from practice and understanding the interplay between steamed milk and espresso
Steaming milk to the right consistency and temperature is crucial for creating a beautiful rosetta design, and this involves paying close attention to the sound, texture, and smell of the milk as it’s being steamed
True mastery of the rosetta design comes from combining technical skills, such as free pouring and etching, with a creative vision and attention to detail, allowing you to tell a story with every cup
The Art of Rosetta Pouring
Pouring a rosetta is not just about moving steamed milk in patterns, it’s about understanding the harmony between texture, temperature, and the subtle dance of espresso and milk, where every pour is a journey of discovery and every design a reflection of the soul.
Julian Vale
Mastering the Art of Rosetta Pouring

As I reflect on our journey to mastering the rosetta in latte art, I want to emphasize the importance of precision and practice. We’ve covered the essential steps, from steaming milk to executing the perfect pour, and explored techniques for refining your craft, such as paying attention to the texture and temperature of the milk. By dedicating time to hone your skills and understanding the intricacies of latte art, you’ll be well on your way to creating stunning designs that elevate the coffee experience.
As you continue to refine your skills, remember that the pursuit of the perfect rosetta is a lifelong journey, not a destination. It’s about the joy of creation, the satisfaction of improving with each attempt, and the connection you make with others through your art. So, don’t be discouraged by setbacks or imperfections – instead, embrace the process, and let your passion for latte art shine through in every pour.
Frequently Asked Questions
What is the ideal temperature and texture of steamed milk for creating a rosetta design in latte art?
For a rosetta, I’m looking for microfoam that’s silky smooth, around 140°F to 150°F. The ideal texture is like whipped cream, but still pours effortlessly – this is where the magic happens, and your design comes to life.
How do I adjust the flow of steamed milk to achieve the perfect rosetta pattern?
For a perfect rosetta, you want a silky, velvety milk flow. Adjust your steaming pitcher’s angle and height to achieve a smooth, rounded stream. Aim for a flow that’s like honey pouring from a spoon – steady, consistent, and utterly controlled. This is where the magic happens, folks!
What are some common mistakes to avoid when pouring a rosetta in latte art and how can I troubleshoot them?
When pouring a rosetta, I see many baristas struggle with uneven flow, over-aeration, or inadequate temperature control. To troubleshoot, check your steaming technique, ensure the ideal milk texture, and adjust your pouring speed – it’s all about finding that sweet balance, my friend.